
IKEA DUKTIG play kitchen remodel

I took a bit of time off in December. By “time off” I mean I didn’t paint, didn’t create content for my website, didn’t post to social media. But when you’re a creative person, you never really stop producing. My focus simply shifted from Crossing Light Studio to other projects, like drying orange slices, finishing a small knit throw I started years ago, and figuring out a lighting upgrade in my workspace. But the main project I tackled was a Christmas gift my husband Van and I made (er, semi-made) for our toddler – a new play kitchen.
BACKGROUND
I wasn’t raised in any church, so I’ve always celebrated Christmas in a secular way with a focus on family, friends, food, tradition, reflection, and creativity. That last one may seem unexpected to you, but if you think about it, most of us practice a bit of creativity at Christmas in some form. We find innovative ways to use up the last piece of wrapping paper, we bake and decorate cookies. We decorate a lot of things actually – from the tree to entire rooms and front yards. For me, creativity has always been a central part and one of the highlights of Christmas (or of any holiday, really). My mom, sister, and I have been known to spend almost as much thought on presentation of gifts as the gifts themselves, and we always try to produce handmade gifts when we have the time and energy.
I have a 2.5-year-old, and this is the first year he really seemed to get some of the concepts of what we do for the holidays. Well, mostly. He did tear into a present or two even after repeating verbally “we should wait until Christmas to open it,” but that just prompted me to keep the rest of his gifts hidden, which I had planned to do anyway. He’s also become quite interested in pretend play. He makes us coffee and scrambled eggs at a small plastic hand-me-down play kitchen that our friends gave us. So for his main gift from Mom and Dad this year, I decided he would probably be excited to receive an upgrade. Growing up, I know the play kitchen we had was one of our favorite toys for a long time. And to be honest, I’ve had a vision for DIY-ing a play kitchen since before he was born.
PLANNING
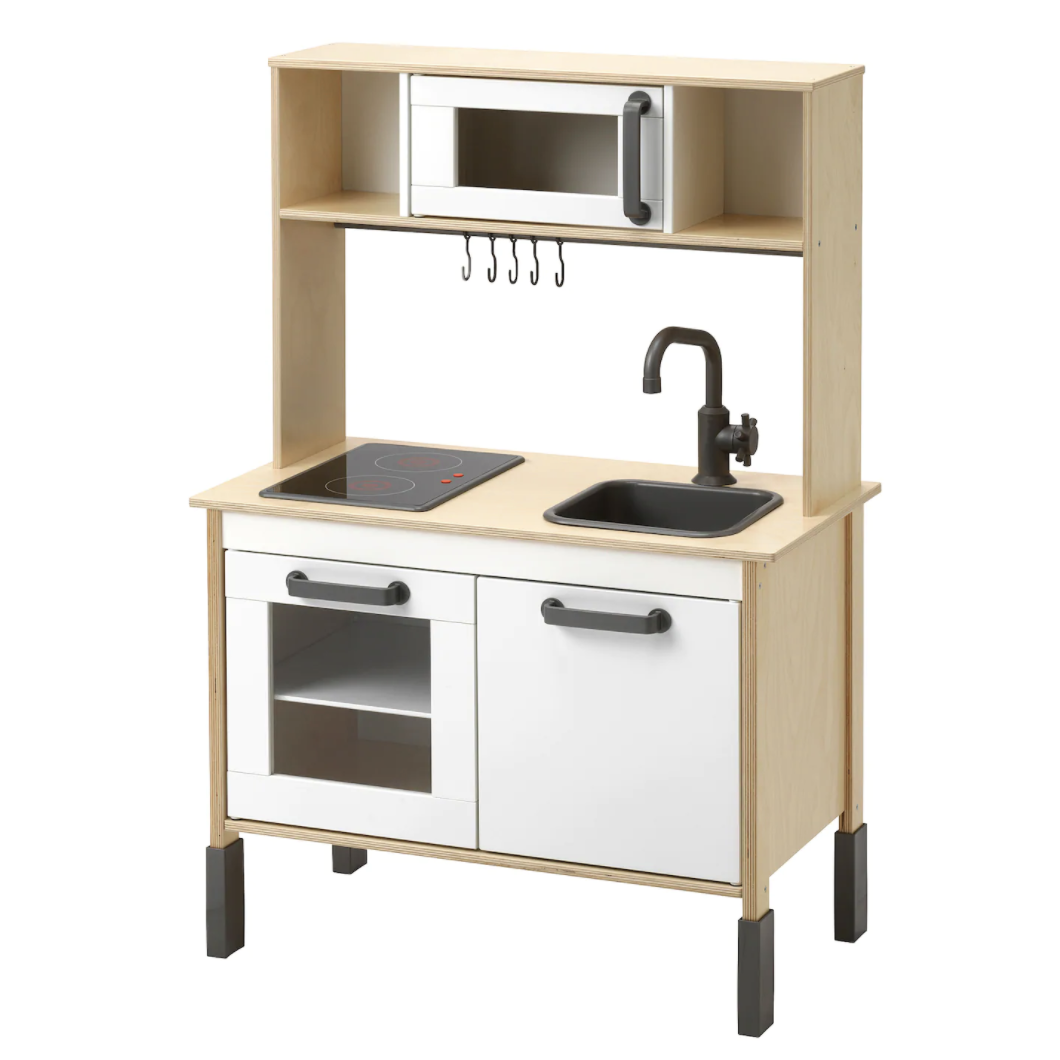
The original DUKTIG
Pinterest – everyone’s favorite source for creative DIY inspiration – was naturally instrumental in helping me devise a plan for this play kitchen. Through many late-night browsing sessions I discovered that there was a whole world devoted to customizing the IKEA DUKTIG play kitchen. Some people redid it to match their real kitchens, others simply chose more palatable colors, and others still added wallpaper or custom decals purchased on Etsy (yes, there are shops that sell stickers and accessories specifically for changing up your IKEA DUKTIG play kitchen).
Originally I wanted to make this an upcycling project where we would find free hardwood furniture like an old tv hutch or two nightstands and transform them into a play kitchen. But after scouring Craigslist, Facebook Marketplace and Nextdoor for several weeks without finding anything that seemed right, the DUKTIG solution became more and more appealing. If I could semi-DIY the actual kitchen, I’d have more time and energy to accessorize and fill it with goodies. So we purchased the IKEA kitchen and kept it in the box in the garage for a couple of weeks while I decided on paint colors.
DESIGN
I based my design heavily on one by Kandis Marino of Kandis Marino Photography, although we opted to keep the upper portion of the kitchen intact instead of converting it into a microwave with floating shelves. We also added a fridge made from the small BILLY bookcase with OXBERG door, similar to what Jamie Leigh Miller did on her blog. A complete list of all products I used in this project is at the bottom of this post in case you’re interested in replicating any or all of this.
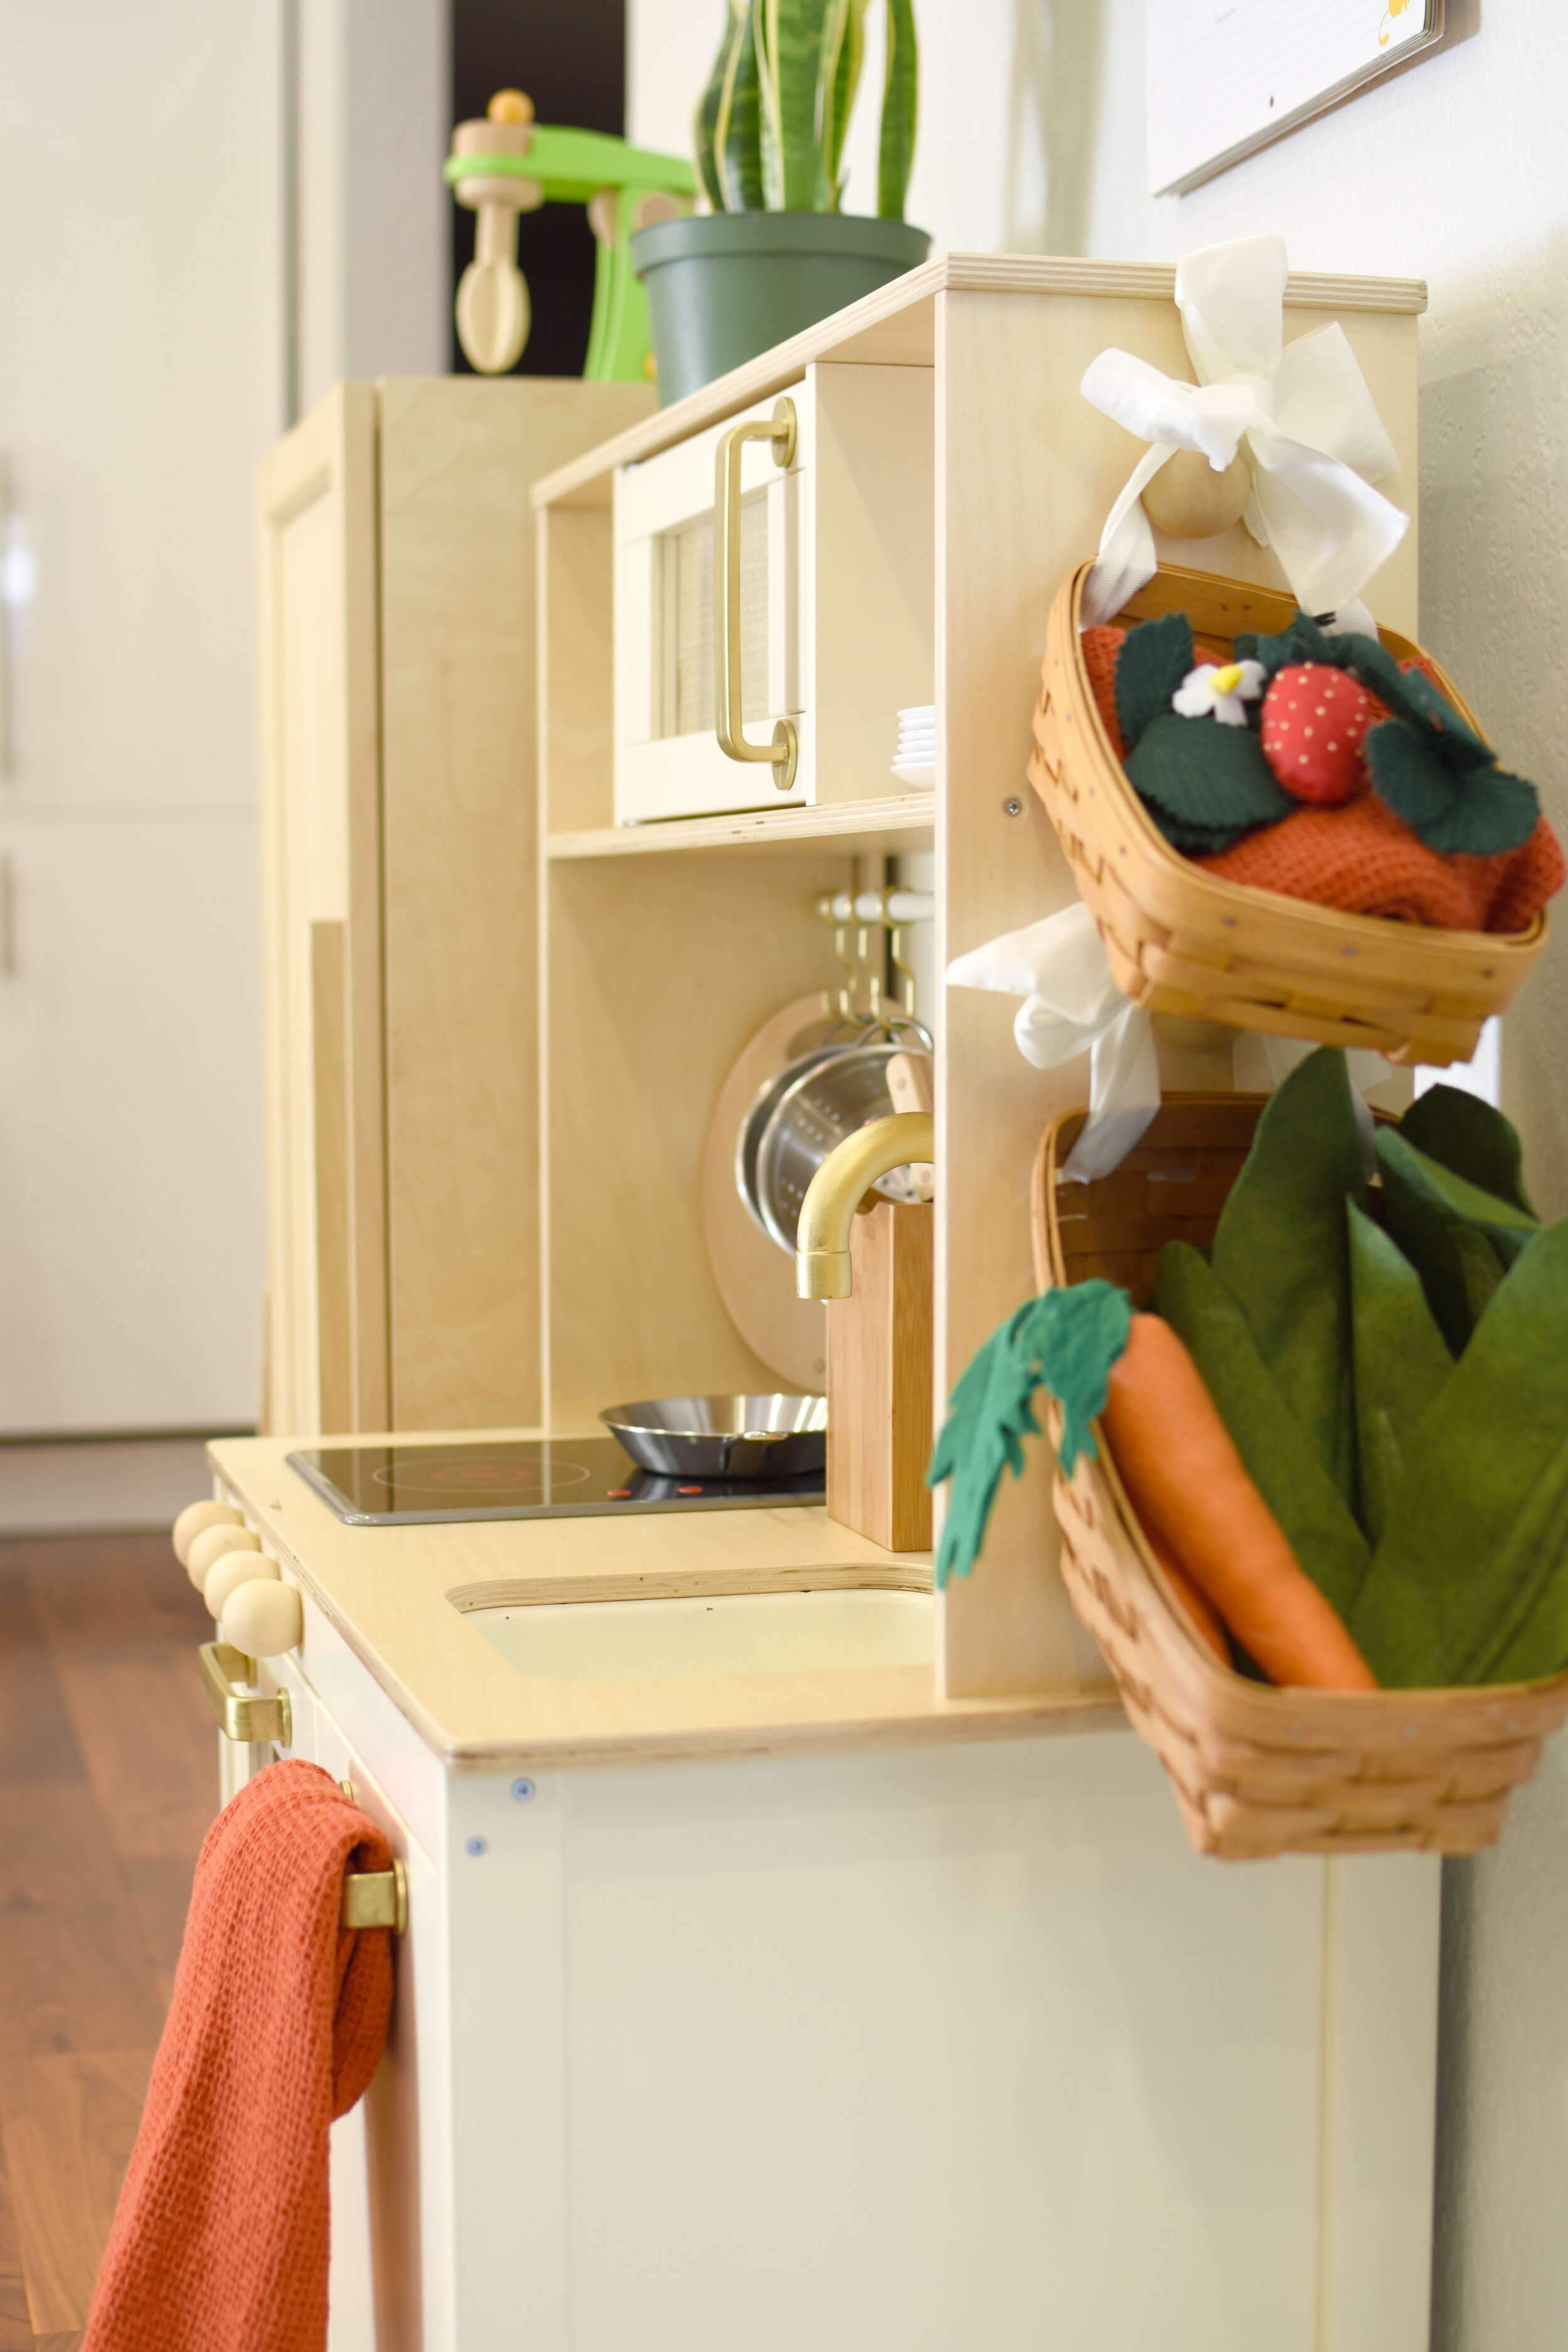
I went with the same antique white paint that Kandis used; it looked nice and warm against the natural wood color. We used this for all the pieces below the counter and for the white pieces surrounding the microwave. We also sprayed and under-mounted the sink. Then we splurged and tried this gold paint, which I was quite happy with. In the past I’ve tried various gold spray paints and was never satisfied with how they came out. This one was just the right tone and sparkle – a relief since it was so expensive. We used the gold to paint the faucet, handles, and little hooks that came with the play kitchen. We gave all surfaces to be painted a good scrubbing with sandpaper and did 3 coats with sufficient dry time in between.
I loved the way Kandis used natural cane webbing on the inside of the microwave door, but I didn’t want to order a sheet of the stuff just for that. Instead, I found some woven placemats at a thrift store that looked similar enough and were the right color to match. Did you catch that? Yes, if you’ve read my previous blog posts, you’ll know I’ve been avoiding any trips to the thrift store even though I love it so. Thrifting during covid times is not an essential activity. But I made an exception for this project and took one trip to Goodwill to see what I could find. I knew one trip would be sufficient to find at least a few things at a good price. More on that below.
I ordered round knobs from Amazon to add to the stove (yes, I know there are only two burners, but four knobs look better!) and I also attached them to the sides of the kitchen and fridge for hanging baskets and an apron. I contemplated replacing the IKEA handles with wood ones, but I opted to stick with the existing ones and just spray them. If you’re trying this yourself and decide to change them, I did see in my research that you can swap them with another handle as long as the screws sit five inches apart. Just be sure to choose handles that are wide at the base; the kitchen has large countersunk holes that are pre-drilled to fit the stock handles.
In some examples I saw, DUKTIG renovators made a replacement countertop or placed a cutting board over the stove for a cleaner, all-wood look. I nearly went that route, but I knew my kid would love the light-up burners of the stove. I’m happy with my decision – so far, every time he uses the stove he remembers to turn it off when he’s done cooking, which I think is hilariously cute.
We didn’t do much to the BILLY + OXBERG combo besides adding a handle made from wood of the same color that we had lying around in the garage. The unit comes with three shelves. Had I given myself some more time for this portion of the project, I would have scrounged some metal racks to make it more fridge-like. But that’s okay. We refer to it as a fridge, but it also acts as a cabinet for storing extra plates and things.
ACCESSORIES
This project really became a team effort when my mom and sister asked what to get the little one for Christmas. I sent some ideas and they gifted some of the details that make the kitchen complete, including a set of wooden cooking utensils, a tea set, and plates made from recycled material.
Did I mention yet how much I scored at the thrift store? I got a small stainless steel bowl, two woven wood salad bowls, the aforementioned placemats that I cut up and used for the microwave window, two small burnt orange dish towels that look super absorbent (I want to steal them for the real kitchen), and a bamboo container that neatly holds all of his new kitchen utensils.
I sourced other things online, like a set of small white melamine plates from eBay that fit perfectly in the upper shelf, a stainless steel pitcher from IKEA, and the DUKTIG pots & pans play set, also from IKEA. I knew I wanted to hang some small baskets on the side to hold some felt fruit and vegetables I had made previously, and finding the right ones proved to be harder than I had anticipated. I ended up buying a set of used Longaberger handmade baskets from shopgoodwill.com. They cost me a whopping $15 for 3. (In case you didn’t know, Goodwill makes a bunch of their more desirable stuff available for sale online.) I strung some thick ribbon I already had through the gaps in the baskets and hung them on the side. I did have to wedge them in under the knobs a bit to keep them from falling off. A proper hook would have worked better.
So that’s about it for this project. It was the biggest thing I took on in December, and probably the most fun. It was almost as fun as watching the little guy react to it on Christmas morning.
Below are the items I used for this project. Please note some of the accessories were things we already had and may no longer be available. If I missed anything, leave a comment or send me an email. And if you create your own kitchen inspired by this one, please share! I’d love to see it.
PRODUCT LIST - kitchen
Kitchen – IKEA DUKTIG Play kitchen
Fridge – IKEA BILLY Bookcase and OXBERG Door with custom handle made from a 1x2” piece of scrap wood
White paint – Rust-Oleum Painter's Touch 2X Ultra Cover in Satin Heirloom White
Gold paint – Krylon Premium Metallic Spray Paint in 18K Gold
Material for microwave door – Woven plastic placemats found at Goodwill
Knobs for stove and hooks – Darice Unfinished Wood Ball Knob, Natural, 1-1/2-Inch
PRODUCT LIST - accessories
Apron – from Odin Parker Handmade Wooden Kitchen Tools set
Dish towels – found at Goodwill
Hanging baskets and round basket – Longaberger found at shopgoodwill.com
Play pots & pans – IKEA DUKTIG 5-piece toy cookware set
Play utensils – Odin Parker Handmade Wooden Kitchen Tools with apron
Rectangular basket – Target
Salt shaker – from Melissa & Doug Prepare & Serve Pasta Set
Stainless mixing bowl – found at Goodwill
Stainless pitcher – IKEA MÅTTLIG Milk-frothing jug
Tea set – Plan Toys Classic Tea Set
White melamine plates – set of 6 Laguna Melmac 6” plates found on eBay
Wooden canister for play utensils – found at Goodwill
Wooden coffee cups and milk carton – from Melissa & Doug Wooden Brew & Serve Coffee Set
Wooden fruit, cutting board, and knife – this was a gift, but there are similar sets on Amazon
Wooden mixer – Hape Mighty Mixer
Woven wood salad bowls – found at Goodwill